Deck the Hulls !!!

Richard Glynn

New Member
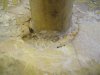
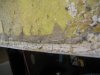
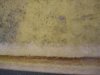
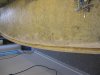
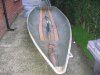
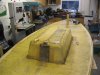
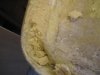
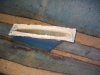
I purchased an old laser which appears to be in reasonable condition other than the Deck and the Hull are separating in a couple of places, up to a foot in length.I am not sure whether the Deck has been removed before or not. I was told to use Epoxy resin and matting to stick the two together but the adhesive that is currently between the hull and deck seems to be some form of semi-flexible, white adhesive/sealant (it can be cut out,with some difficulty,with a Stanley knife). Can anyone tell me whether this is the original hull/deck sealant and what it is? Would it be better for me to open up all the seams, clean out the old adhesive and use epoxy or re apply the same adhesive/sealant that is currently there?
Also does any one know whether there should be any sort of bulge in the hull where the mast would go ( it looks like reinforcement but original)?
All the best,
Rich.:confused:
 
it sounds to me like a dodgy attemp at sealing it with sealys no more gaps ... peel it all out and use the epoxy resin and matting.
 
Actually sounds like it is sealed with 3M 5200 or similar. On older boats this is a preferred method of sealing as it is flexable. Epoxy is hard and will crack/fall out of the joint. Just clean up the areas that are separating and lay in a new beed of 5200...
 
Also does any one know whether there should be any sort of bulge in the hull where the mast would go ( it looks like reinforcement but original)?

Most older boats have a bit of shrinkage evident in the bottom of the hull around the maststep. I don't think there's anything you can or should do about it.
 
Yep, sounds like 5200 to me. 5200 is great, and is what many larger boats use to bond the deck to the hull, in combination with mechanical fasteners.

I had about a foot long separation going.

1. Pry it open as far as possible without breaking/loosening the existing "good" joint

2. Remove as much old gunk as possible with knife, screwdriver, dremel, etc... (I used dremel with cutting wheel)

3. Shoot as much quick-drying-formula 5200 in there as possible.

4. un-pry whatever you were using to pry it open, and clamp them together until it sets. (this is why you want quick drying -- non-quick-drying takes about 2 full days to set!)
 
Just an FYI the quickdrying 5200 is 3M 4200.....

Not so...

The quick dry 5200 is called Fast Cure 5200 and comes in a red and white tube.

4200 is an entirely different product which has different propeties than 5200. Its adhesive strength is not as much as 5200.

Neither product is appropriate for repair of a separated Laser hull deck joint. The deck joint on a Laser must be made with stiff material or the entire boat will flex.


Either 4200 or 5200 is an appropriate sealant for filling small gaps in the bonding material.

Neither should be used to bond any significant length of broken seam.
 
My bad, the quick dry 5200 is called Fast Cure 5200 and comes in a red and white tube. I would still use it for repairing an old boat...
 
[4200 vs. 5200]
Neither product is appropriate for repair of a separated Laser hull deck joint. The deck joint on a Laser must be made with stiff material or the entire boat will flex.


Either 4200 or 5200 is an appropriate sealant for filling small gaps in the bonding material.

Neither should be used to bond any significant length of broken seam.

You've certainly repaired more boats than me and I respect your experience.

But have you seen how hard and stiff 5200 sets up?

Consider a 3/4" x 24" bonding area along an extended seam.

I challenge you to take a 2 foot long piece of 1x2 and glue it down along its skinny edge to a thick piece of scrap plywood with a bead of 5200 then clamp it until it sets. Do another similar piece with epoxy.

After everything's cured, try to identify any distinguishable "flex" in one joint vs. the other, short of complete failure of the glued joint.
 
Thanks everyone for your replies.As I was cleaning out the joint, it became obvious to me that the deck had been off previously and it had been put back with what looks like car body filler ( David's Isopon, I think). I decided that the best thing would be to take the deck off again clean off the filler and re-attach the deck and while I've got it open,strengthen the mast step and dagger board casing.
I have tried to attach some photos. Any comments would be gratefully received.
I am a little confused as what to use to stick the deck back on with. Epoxy might be best but it dries very quickly and won't give me much time. 3m 5200 could be expensive.

All the best,
Rich.
 

Attachments

  • Laser 009.jpg
    Laser 009.jpg
    167.1 KB · Views: 271
  • Laser 008.jpg
    Laser 008.jpg
    112.8 KB · Views: 264
  • Laser 007.jpg
    Laser 007.jpg
    49.4 KB · Views: 231
  • Laser 012.jpg
    Laser 012.jpg
    169.2 KB · Views: 225
  • Laser 010.jpg
    Laser 010.jpg
    121.8 KB · Views: 224
  • Laser 011.jpg
    Laser 011.jpg
    156.1 KB · Views: 268
Thanks everyone for your replies...

All the best,
Rich.


By the way, ¿did you find something inside the hull?

I boght a 159XXX 1996 boat, and when I move the hull I hear something inside making noise. The previous owner told me there are floats inside, ¿is that true, or something is wrong and I should start worring about it?
 
Hi, yes there are 3 large floats, one in front of mast step, two between mast step and dagger board casing and three smaller ones at the back. Six in all.
 
Wow.

I think I could go broke buying enough C-Clamps to hold that while it was setting.

If it were me, I'd be tempted to use 5200 and add mechanical fasteners (screws, washers, nuts) at the hull deck joint, then put a layer of glass cloth tape over the fasteners where I sit while I'm hiking. Naturally, that would be really ugly. You can buy 5200 in caulking tubes and apply it with a caulking gun, rather than the little hand-squeezed tubes. I'm thinking you could do the whole thing with between 2 and 4 tubes.

All the contact points where it goes back together will be fun...

Getting the seal around the cockpit drain right will be tricky.

Getting the mast tube sealed into the mast step will be tricky.

Getting the top of the centerboard trunk sealed to the deck will be tricky.

It occurs to me that maybe I'd bond the thing back together at the hull deck joint, then cut inspection ports and use those to give access inside where I'd put down some resin and cloth to reinforce the daggerboard trunk and mast tube attachement points, and reseal the cockpit drain.

If it were me, I'd be at risk of forgetting to put the cubitainers back inside before setting the deck back on top of the hull. Don't do that ;-)
 
Thanks for your advice ( especially about floats). Fortunately I have hundreds of clamps because I repair musical instruments. I was thinking of using a bending iron to bend a length of wood to clamp under the hull and then using about 40 clamps on each side. If the 5200 is fluid enough and not too hard, I might be able to put down sufficient enough of a bed around the contact points, not to need inspection hatches.
I'm sure it is going to be pretty tricky no matter how I do it.
I think I'll go for 6 large tubes of 5200 and use plenty around the mast step and center board housing.
Do you have any idea how quickly the 5200 starts to skin?
Thanks again,
Rich
 
ooo this is off topic but i wish i could make/ repaid musical instruments ... i personally play the double bass which does not like the tropics up here in cairns very much and every couple of years i have to get the neck reattached :rolleyes:
 
Please listen to Gouvernail when he says to not use 4200 or 5200 for this sort of repair. He repairs boats professionally. http://www.schrothfiberglass.com/

Also, I've used 5200 to put rubber bumpers on my Laser (clumsy newbie sailor) and after a year was able to peal it right off by hand.

Some sort of epoxy is the right stuff to use for this.
 
You've certainly repaired more boats than me and I respect your experience.

But have you seen how hard and stiff 5200 sets up?

Consider a 3/4" x 24" bonding area along an extended seam.

I challenge you to take a 2 foot long piece of 1x2 and glue it down along its skinny edge to a thick piece of scrap plywood with a bead of 5200 then clamp it until it sets. Do another similar piece with epoxy.

After everything's cured, try to identify any distinguishable "flex" in one joint vs. the other, short of complete failure of the glued joint.

Yes. I will grant you that one.

IN fact, considering the old fashioned mush used to glue Lasers together, the 5200 is probably better from day one to forever.

I just have a fundamental problem with a "rubber" joint as opposed to a "hard" joint.

Probably you are correct and I should encourage folks to worry about other things before concerning themselves with my rubber joint phobia.

On the other hand...when you were in college did anybody hand you a rubber joint??

Did you light it??

Inhale??

Clinton didn't

It is a really bad thing to do...

In fact, maybe...

you could not later serve as the US President...

But you would be OK for the job if you snorted a bunch of cocaine, skipped your flight physical to avoid detection, went AWOL, had that ignored and when caught with cocaine by the Houston cops did community service in exchange for sealing of your record related to the cocaine posession charges...

but I digress.

the 5200 is probably fine for the Laser seam.

But ...remember..
Don't make the seam lighter and thinner than the original seam...

Then your boat would be a nice boat but it wouldn't be a Laser anymore.
 
So what would I really do??

I would contact the nearest Laser builder and see if they would ship me enough of whatever they use to re glue the joint.

2 inch c clamps work well and they work even better if you use long stiff wood sticks to spread the load. You can buy fifty c clamps for $100 and have them the rest of your life
While you are at the hardware store pick up three 8 foot strips of oak trim to spread the load.

last...think about how you are going to use a bolt to seal the bailer hole...or maybe install the brass through hull thing at hull deck glue time.

And..How are you going to position the mast step exactly where you want it to be?

The edgewise plywood under the cockpit floor is notorious for breaking loose. This would be a great time to change the top to a "T" shape so there will be a huge glueing surface.

How do you plan to press and seal the deck against the top of the centerboard trunk?? I have used a couple boards, some foam padding and boolted the deck on with two pieces of all thread stuck out the top and bottom of the slot.

What about keeping the shape true to a Laser??

It is a little late to use your boat as a pattern.

I like to use four or five cross supports which I have cut to match the hull curves.

Mostly?? I am very sorry your deck is off your Laser. Friends don't let friends take the decks off Lasers.
 
I'm getting further and further afield from my area of expertise (computer wonk by trade)

I'll just throw in two things:

1. The thought of smoking a rubber joint made me laugh out loud.

2. For a job this big, if you choose to go the 5200 path vs. the epoxy resin glue path, then probably NON fast drying 5200 would be the right stuff. Then you'd have as much work time as you could possibly need. I originally recommended the fast drying stuff for jamming into a reasonably small crack. I don't remember the exact cure times. Read the label or get the info at westmarine.com
 
Thanks again. I must say, I prefer to put Resin ( not epoxy) in my splif rather than smoke a rubber joint but cookies are best. I take it that the Houston incident is a reference to Pres. Bush? very good!!!!
Seriously though, If I could have avoided taking the deck off I would have done, it's proving to be very tricky. The filler that had been used was falling apart and if I had patched it up it would have come apart further along the seam, also nothing would have stuck to the filler as it had absorbed salt water.
About hull integrity, if I put the deck upside down ,level and supported throughout it's length and put the hull on top, centralize everything, would gravity then help keep the shape?
Does the edge ways ply wood under the cockpit need to be fastened to the cockpit with adhesive/ epoxy? if so is there enough space to make it into a T shape or would I have to reduce the height of the edge ways ply?
I'm going to use a large bolt for the bailer hole.
The Threaded bar idea for the center board housing is a good one, thanks.
I have no Idea how to locate the mast tube into the mast step other than to evenly fill the edge of the donut and hope for the best. I guess the positioning is critical?
I will use lengths of wood, possibly pre-bent, I was just going to use pine ( oak is not easy to get over here) with clamps for the seam
I will try to find out what Laser use for their joint (hope they don't say 'Leaf') and if I decide to go down the 5200 route, I'll use the slow stuff.
I've attached some more photos showing the deck seam before cleaning and after and a close up of the mast tube. I would welcome any comments with regards to reinforcing the mast tube/ deck joint and whether I should fill the deck seam with epoxy + matting to be flush with the rest of the deck, at the moment there is a half inch wide groove left where the filler has been removed. It would obviously save on sealant if I use the epoxy first, but is the groove there for a reason?;)
All the best,
Rich.
 

Attachments

  • Laser 013.jpg
    Laser 013.jpg
    68.5 KB · Views: 165
  • Laser 016.jpg
    Laser 016.jpg
    76.1 KB · Views: 153
  • Laser 014.jpg
    Laser 014.jpg
    56.3 KB · Views: 159
  • Laser 015.jpg
    Laser 015.jpg
    114.7 KB · Views: 165
About Double Bass Neck joints.

The neck joint on an instrument is always made with slightly weaker glue. Always use hide glue, pearl,or similar natural glue. If the joint keeps coming apart, check the compatibility of the glues, perhaps someone has used a PVA based glue previously, hide will not stick to this. Next time it happens try to get the joint completely free of all glue and perhaps use a slightly stronger glue ie cooked glue to water 3-1 or even full strength if humidity is severe.
Good luck,
Rich.
 
Thanks again. I must say, I prefer to put Resin ( not epoxy) in my splif rather than smoke a rubber joint but cookies are best. I take it that the Houston incident is a reference to Pres. Bush? very good!!!!
Seriously though, If I could have avoided taking the deck off I would have done, it's proving to be very tricky. The filler that had been used was falling apart and if I had patched it up it would have come apart further along the seam, also nothing would have stuck to the filler as it had absorbed salt water.
About hull integrity, if I put the deck upside down ,level and supported throughout it's length and put the hull on top, centralize everything, would gravity then help keep the shape?
Does the edge ways ply wood under the cockpit need to be fastened to the cockpit with adhesive/ epoxy? if so is there enough space to make it into a T shape or would I have to reduce the height of the edge ways ply?
I'm going to use a large bolt for the bailer hole.
The Threaded bar idea for the center board housing is a good one, thanks.
I have no Idea how to locate the mast tube into the mast step other than to evenly fill the edge of the donut and hope for the best. I guess the positioning is critical?
I will use lengths of wood, possibly pre-bent, I was just going to use pine ( oak is not easy to get over here) with clamps for the seam
I will try to find out what Laser use for their joint (hope they don't say 'Leaf') and if I decide to go down the 5200 route, I'll use the slow stuff.
I've attached some more photos showing the deck seam before cleaning and after and a close up of the mast tube. I would welcome any comments with regards to reinforcing the mast tube/ deck joint and whether I should fill the deck seam with epoxy + matting to be flush with the rest of the deck, at the moment there is a half inch wide groove left where the filler has been removed. It would obviously save on sealant if I use the epoxy first, but is the groove there for a reason?;)
All the best,
Rich.
 
At last, got all the old filler off and roughed up grp. I've been in touch with Laser in the uk. They think that the filler might be original as it sounds similar to the type of adhesive filler they use in production ( I thought they used Epoxy but apparently not so). Unfortunately they can't send me any but they've recommended a product that they use to bond the hull/deck on an SB8, it's called Crestomer and is made by ScottBader. They think that it will be ideal for re-attaching the deck. I'll post more info when I get it.
 

Back
Top