Broken mast tube... Repairable?

LQT420

Member
Hi Guys,

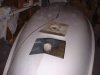
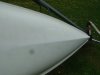
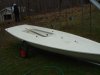
I am seeking your wisdom and was hoping that you guys may be able to assist. I have a used Laser with a broken mast tube that I bought for a good deal on this site. The boat itself is in pristine condition it's just the mast tube that's the problem.

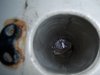
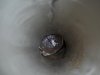
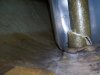
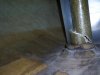
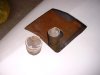
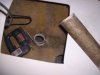
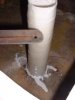
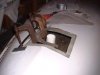
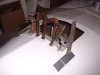
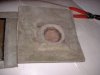
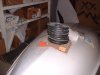
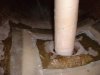
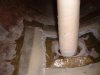
Te original owner tried to fix a leak in the mast step by pouring epoxy down the step... however he poured about 2" of epoxy down the tube! When he took the boat out, the upper part of the tube sheared off of the bottom 2" of the tube because of the forces that the rig exterted on 12" of tube rather than 14". The deck is still in good shape becuase he dropped the rig immediately.

I've scanned the site for mast step repairs and have seen only repairs for cracked tubes, not completely broken ones with jagged edges. In your opinion, is it possible to remove the bottom part of the tube from the doughnut and grind out the epoxy with a roto tool and then reattach it to the upper part with fiberglass cloth and epoxy? Would this type of repair be strong enough? Or should I spend the money on the repair kit with a new fully intact tube? At this point I am too afraid to cut out inspection ports for fearing that the repair kit may be a better option.

I've attached some photos for reference. I appreciate any advice you may be able to provide.

Thanks,

- Leon
 

Attachments

  • Down Tube.jpg
    Down Tube.jpg
    76.2 KB · Views: 84
  • Down Tube 2.jpg
    Down Tube 2.jpg
    70.8 KB · Views: 74
  • MS1.jpg
    MS1.jpg
    112.1 KB · Views: 86
  • MS2.jpg
    MS2.jpg
    104.1 KB · Views: 69
Hi,
my opinion is, that there is a chance to refit the tube.

Think about a sort of coat.

F.E. a suitable PVC-Tube, that you cut also to the length for that you may put it around the broken fibre glass tube of the mast step at the boken base. Seal that tube enough with marine silicone. Then, reinforce the outer tube with several ayers of fibre glass and West Marine resin. Inside of the mastsep seal the wall enough with West marine resin, but take care for that the lower maststep still is able "to work" inside of the tube (means: only a few resin tho seal the broken area - the real reinforcment is done outside of the broken maststep /inside of the hull).

This, I guess, will hold for another season of fun on the water.

One point there is to think about: the reinforcing of the base (in such a way that the old maststep-base to maststep tube plus reinforcining-tube get a durable joint). Perhaps our TLF experts have a solution for that.

Good work on that
LooserLu
 
Thanks for the ideas LooserLu, but I'm thinking if it's only a quick fix for a season, than maybe I should go for the mast step kit and get a more permanent fix? Thanks, and keep the ideas coming!
 
How did you get in there to take the pics if there are no inspection ports?

Another option would be to make a new fibreglass tube about 3/4 length, cut all of the old broken tube out except the last top 1/2 or 1/4 and glass the new tube to the top of the old one. Use a new donut etc.

Can't see how you will get in to grind that resin out otherwise, and it may be easier to cut all the old broken stuff off and start with new instead of patching. As you've seen, all the load on the mast tube is at the top and the bottom, so move the repair joint to as close tot the middle as you can. Also looks like the deck is sunken a bit. Probably a prop inside while you work would do the trick.
 
The photos are taken through an inspection port next to the daggerboard. In the first post I meant I was afraid to cut ports in the deck because if I go with the kit, I don't don't want to screw up the deck template cut out.
 
If you have some glass/epoxy experience, and understand all about prepwork etc., then I'd recommend a "thru the bottom" repair.

I've done a couple this way, and it appropriate whenever the deck is intact, or easily repaired, simple because the finished product can look really good. I have used the deck plate kit, but they are very expensive, and quite ugly.

I'll post some pics describing this method, they should be pretty self explanatary, but it may take a couple of posts.

These two show the cut, and you can see in one that this guy also put two inches of epoxy in his tube. Clearly not a good idea.
 

Attachments

  • base&cut.JPG
    base&cut.JPG
    70.3 KB · Views: 84
  • Picture 012.jpg
    Picture 012.jpg
    72.9 KB · Views: 87
You basically grind any old loose stuff off the parts that will be replaced, and also grind the inside of the hull to smooth it, and make it fit the flanges to be applied later.

Then I cut off the bad part of the tube, leaving as much as possible. I have made a mandrel, to make new tubes on. This part was quite hard to get good sizing, and ended up being a trial and error job.

The new tube is whitened epoxy, so I don't have to mess with gel coat. The new tube is then spliced onto the remains of the old tube.
 

Attachments

  • cut1.JPG
    cut1.JPG
    71.3 KB · Views: 61
  • tube1.jpg
    tube1.jpg
    47.8 KB · Views: 59
The next step is to make flange material. I layup sheets of glass large enough to make the flanges, each of which is 3-4 inches wide. Just lay them up on wax paper, on a flat surface. When hardened, I saw them to the final shapes I want, then prep. I use 4 seperate pieces, as they are easier to clamp individually, than a single 4 sided flange.

This step looks complicated, but it's basically what you would do if you bought the kit.
 

Attachments

  • flange2.jpg
    flange2.jpg
    73 KB · Views: 71
  • flange1.jpg
    flange1.jpg
    73.3 KB · Views: 62
Then everything is ground to fit back together, and the tube is checked for length, etc. Also, when I do the assembly step, you have to make sure the deck is the right distance from the bottom, so you end up with your finished 14" tube, as deep into the donut as possible.

I don't build a bottom on the tube, that comes later.

I use whitened epoxy for this assembly step so that I can see if it has sealed and flowed nicely all around. I have cut a port about 9" from the mast, at the 4:00 position.
 

Attachments

  • base1.jpg
    base1.jpg
    70.2 KB · Views: 67
  • assemble1.jpg
    assemble1.jpg
    70.9 KB · Views: 55
  • assemble3.jpg
    assemble3.jpg
    70.5 KB · Views: 53
  • assemble5.jpg
    assemble5.jpg
    70.3 KB · Views: 62
I then fill the tube to the 14" deep spec, with WEST, and when it's stiffened a bit I drop the SS disc in. I often use hardward store SS 1/2" fender washers for this, instead of the disc that covers the whole bottom. This step is discussed elsewhere.

After that's hardened, I fill between the tube, and the donut, and glass the two together to add more strength. All this is done thru the port, and is basically the same as other threads have discussed, except you've had the chance to do a nice job of grinding the pieces.

After that it's just a basic gel-coat patch to make the bottom look nice. A white boat makes this step easier, but the new gel coat will always be whiter than an old hull.

The advantage of this system is that the deck still looks good, and you've added less than 2 pounds to the boat.

Of course, this method saves the cost of a kit, but takes a lot of time. Maybe US$70 for materials, assuming you can use the leftovers. I only bother with this type of repair when the rest of the boat is worth saving, and when I have free time in January waiting for our lake to melt.

And, again, if you don't have glass experience, an understanding of prepwork, and a lot of patience, this probably wont work.

Al Russell 182797
 

Attachments

  • 82 bottom 001.jpg
    82 bottom 001.jpg
    67.2 KB · Views: 73
  • Picture 006.jpg
    Picture 006.jpg
    69 KB · Views: 76
Nice method Al - can you describe the layup schedule for the replacement tube and the flanges.

No issues with bending the two lateral flanges to conform to the V hull shape ? (I see it takes lots of clamps) - did you find this just as good as using two pieces each on the fore and aft lateral sections or are you scoring the bottom side with a knife at the centerline ?
 
Wow! Thanks Al, that looks awsome! Let me gather my my thoughts and try to come up with some questions.
 
Al, excellent info, I briefly thought about the "bottoms up" approach but wasnt sure if that would hold. I really dont want the replacement kit, and the topside of my hull is still easily repairable, so this may be my route of repair too.
Thanks again for the excellent info.
 
I don't have a layup schedule, but just use what's around. I like a woven 4" 6oz. If the flange that's bent is about 1/8" thick it fits the hull radius closely enough to fill tightly. Once you flip it over you can easily pour more epoxy into any gap, or layer on more glass to stiffen the hull. I wrap the tube mandrel many times, with the 4", until it's about 3/16" thick. Also, I use as much of the old tube as possible, as they are very strong.

Most of those pics are from an '82, which had an excellent hull/doughnut bond. Older boats may need to be redone.
 
I may have access to a free beat up used hull with an intact mast step. I was wondering, if I remove the intact tube from that hull, and cut out my existing mast step tube about 2" below the deck, would I be able to mate the bottom 12 inches of the intact tube with my 2 inches of remaining upper tube using fiberglass cloth and epoxy? Would the bond be able to withstand the stresses exerted on it? Can I use gelcoat or epoxy & filler to mend and fair the connection on the interior of the tube? I just don't have the fiberglass experience to cut into the bottom of the hull... doing that kinda scares the hell out of me.
 
Yes, if you can get the tube out of the donor hull, you can use it. The bond between the existing tube and new piece will be plenty strong, the only real loading on the tube is at the deck and hull. You don't need to go crazy getting the connection on the inside of the tube perfect, it just needs to be smooth. I would recommend not cutting the existing tube near the top, but more in the middle - it's much easier to see and work on the lower part of it thru an inspection port - working on the upper section is mostly touch and feel.
 

Back
Top