Minor-Repair of a damaged deck to mast-step joint

LooserLu

LooserLu
Hi,
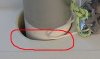
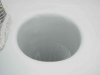
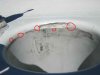
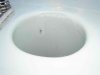
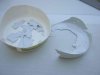
today I start to do a "minor repair" of the damaged "deck to mast-step"-joint of my Laser GER 171442. This Laser has been built in 2001 by the European "Out-Of-The-Box-Boat-Builder" Performance Sailcraft Ltd in England/UK. Last Winter, I bought the boat from a good pro-Laserite of GER, that only used it for a few major-races and some practice hours in 2001/2002. Then the hull has not been sailed for several years (only was stored dry and comfortable in a car-garage).
This damage also my old Laser 46438 had. I did the repair for that 28 years old Laser in 2005 with good success. Of course I am "not amused" with the quality of that product, Mr. D. Graham, the CEO of Performance Sailcraft Ltd in England/UK, did brought out of his factory. This hull is the best proof, that this sort of "economic humans" are only interested to get quick-money for a product in reall not is worth 5500 Euro (for the "Classic" version; 1 Euro is about 1,20 US-$).
Ok, I don't want to waste your time to much for ranting about such individuals, but to show "step by step", how such a "minor-repair" can be done "selfmade".

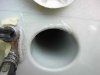
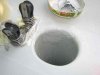
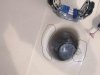
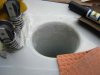
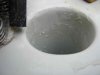
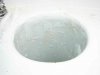
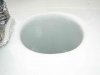
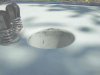
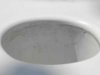
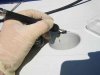
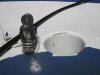
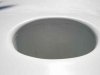
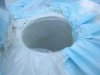
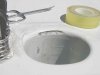
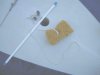
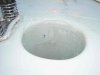
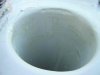
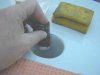
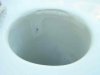
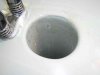
Today I start to sand down V E R Y careful the rotten gelcoat at the damaged area of the "deck to mast-step"-joint with a "Dremel" driller. Then, I take some new photos for you, ok. I am most careful for that the Dremel driller do not damage the fibreglass!! This is a very important point for a successful repair! The hull has been stored till now: dry and the fibreglass now is "dry like a stone in the "Desert of Atacama" (diest desert of the world, in Chile...) in the High Noon sun".

Wish me luck ;o)


Ciao
LooserLu

to be continued
 

Attachments

  • Damaged Maststep portside 1.jpg
    Damaged Maststep portside 1.jpg
    56.4 KB · Views: 72
  • Damaged Maststep portside 2.jpg
    Damaged Maststep portside 2.jpg
    48.2 KB · Views: 70
  • Damaged Maststep starboard-side.jpg
    Damaged Maststep starboard-side.jpg
    45.3 KB · Views: 63
Re: Minor-Repair of a dammaged deck to mast-step joint

Hi again,
now, the sanding procedure has been successful.
It did need two steps of sanding to get out the rotten gelcoat etc.
Aft the 1st sanding, I cleaned the damaged area at the portside dry with a brush for my dremel diller, to eliminate the dust at the survace. Then, I took on my rubbergloves and cleaned that area again, but "wet" with acetone and the brush on dremel driller.
Aft that, I was able to decide, which areas do need a 2nd sanding and which not. I decided not to sand the starboard side. There are only hairline-cracks and it is better, not to sand there anything. Perhaps it is better only to put on there only a very thin epoxy-resin layer (but really very thin, to close the cracks to not let in water).

Now, I have to wait for an hour to make sure, that the acetone did dry away. Aft that, I plan to take "Tesa-Film"-tape and make it around the damaged areas to prevent, that the new layer of gelcoat only comes to that areas, I want to have it.

Now, it'stime to stop the this work for today, FIFA-Soccer-World-Cup continues in a few minutes and the LooserLu can't wait to see the 1/4-final-match between England and Portugal :)

Ciao
 

Attachments

  • The  Dremel driller.jpg
    The Dremel driller.jpg
    55 KB · Views: 55
  • dry cleaning aft the 1st sanding.jpg
    dry cleaning aft the 1st sanding.jpg
    53.7 KB · Views: 63
  • wetcleaning with acetone aft the dry cleaning.jpg
    wetcleaning with acetone aft the dry cleaning.jpg
    60.2 KB · Views: 81
  • Aft the first sanding -red areas are not ready.jpg
    Aft the first sanding -red areas are not ready.jpg
    25 KB · Views: 77
  • result aft the 2nd sanding and 2nd cleaning procedure.jpg
    result aft the 2nd sanding and 2nd cleaning procedure.jpg
    61.2 KB · Views: 60
  • Starboard side aft cleaning with acetone.jpg
    Starboard side aft cleaning with acetone.jpg
    48.3 KB · Views: 63
Hi again,
todays work is, to repair the damaged area with the first layer of gelcoat. From my experience, several layers are needed, to get a good success of such a repair. The first layer of gelcoat will "suck up" a bit by the total dry (and thirsty) fibreglass. This means, we get a gelcoat-layer, that holds a bit better than just using paint - but it holds less than the producer of the hull did made the original gelcoat to the fibreglass (a "wet" to "wet" joint). I prepared the area where the gelcoat is to be paint to with "Tesa"-tape and then, I did put some foils around the area where I do the gelcoating. Gelcoat is a sort of resin, that you will find everywhere you don't want to have it, if you are careless. This means: put rubber gloves on, "secure your nose/face", wear old cloths!
Then, I mixed the gelcoat resin with its hardener as the producuer did advised it. This sort of gelcoat I used, is a very "thin"-fluid. I have worked with sorts of gelcoat resins, that have been not so thin. This means, it is impossible (for me) to repair the damaged area just in one step. Aft I took a paintbrush and painted the damaged area with the gelcoat, I did wait for an hour (meanwhile I cleaned the paintbrush with acetone to be able to use it again tomorrow). Then, the hardening process of the geloact has been started a bit and it was possible to put "Tesa"-tape over the surface of the fresh gelcoat. This is needed, because gelcoat does not harden 100% under air. This gelcoat hardens full, if a foil of Tesa (or "Hostaphan"-foil) devides the gelcoat layer from the air. The hardening process do need about 24 hours (here in West Germany, it is very warm now and so, the gelcoat does harden faster than usually). I secured the work with a fastfood-soup-cup for that nothing can happens to the dammaged area.
Tomorrow afternoon, I can clean the gelcoated area and can begin to sand down the gelcoat that is not needed and paint the next layer of gelcoat.

See you tomorrow and
Ciao
LooserLu
 

Attachments

  • Just aft the gelcoating of the 1st layer.jpg
    Just aft the gelcoating of the 1st layer.jpg
    60.2 KB · Views: 68
  • Securing the gelcoated area.jpg
    Securing the gelcoated area.jpg
    60.7 KB · Views: 57
  • Taping the 1st layer for correct hardening of the gelcoat.jpg
    Taping the 1st layer for correct hardening of the gelcoat.jpg
    59.2 KB · Views: 68
  • Result of gelcoating the 1st layer.jpg
    Result of gelcoating the 1st layer.jpg
    53 KB · Views: 64
  • Preparing the damaged area with Tesa-tape before gelcoating.jpg
    Preparing the damaged area with Tesa-tape before gelcoating.jpg
    58.7 KB · Views: 65
Andyz said:
Nice pictures! I usually start the job and forget to take pictures at each step!1

Andy
Thanks :)


Lets continue the work.

Today, I'm going to wet-sand the first layer of gelcoat. First, I go and decide if the gelcoat is ready to be sanded or not. This I do by taking the rest of the gelcoat that I not used and try to break it in pieces. In result I came to the opinion, that the new gelcoat did dry out nice and it's time to start the wet sanding procedure.
Therefore I pull off the Tesa-tape, that I made over the surface of the drying gelcoat.
Then I take suitable (= oval body) old cigarette-lighter and a piece of wetsanding paper. I start with a grid of "600" per cm². I work careful and only sand the area, where the gelcoat has been painted to AND: a bit of the geloat that ahs been painted to the Tesa-tape at the sides. I do that sanding as long as the gelcoat begins to chip-off the Tesa-tape. This is the moment I waited for. Now, I can pull-off !very careful! the Tesa-tape to the sides of the damaged area.
Then, I begin to wetsand by hand (with a grid of "1000" per cm² and without using the cigarette-lighter) and only very-very careful especially to the sides, where the new gelcoat meets the old (original) gelcoat. The result shows, that only the different color of the gelcoats let us see where the damaged area is. And, of course the fact, that some areas not have been painted enough with new gelcoat (see the photo where I did mark in red that areas)'. This will bee the work of the next day. I'm the opinion, better to paint a bit less than to much gelcoat, but always a bit more than the level of the old surface of gelcoat has been.
But in the moment, the areas that just have been sanded have to dry. It is a really perfect warm summer night here in west Germany and I guess, tomorrow (~ high noon), I can begin the work to paint the next layer of gelcoat.
I dry the base of the mast tube with a sponge and a sail-batten and secure the working area for the night.

Ciao
Looserlu


to be continued
 

Attachments

  • Secure the dried working area over the night.jpg
    Secure the dried working area over the night.jpg
    46.8 KB · Views: 66
  • Cleaning the base of the masttube 3.jpg
    Cleaning the base of the masttube 3.jpg
    45.6 KB · Views: 64
  • Cleaning the base of the masttube 2.jpg
    Cleaning the base of the masttube 2.jpg
    44.6 KB · Views: 51
  • Cleaning the base of the masttube 1.jpg
    Cleaning the base of the masttube 1.jpg
    48.1 KB · Views: 50
  • Result of sanding with 1000-grid watsanding paper.jpg
    Result of sanding with 1000-grid watsanding paper.jpg
    45.3 KB · Views: 56
  • Result of sanding 1.jpg
    Result of sanding 1.jpg
    52.4 KB · Views: 53
  • Aft a while of wetsanding with 600-grid.jpg
    Aft a while of wetsanding with 600-grid.jpg
    47.4 KB · Views: 66
  • Wet-Sanding the 1st layer of gelcoat.jpg
    Wet-Sanding the 1st layer of gelcoat.jpg
    53.6 KB · Views: 62
  • Test how dry is the gelcoat.jpg
    Test how dry is the gelcoat.jpg
    57.5 KB · Views: 50
  • Result of sanding 1 aft pulling of the Tesa-tape.jpg
    Result of sanding 1 aft pulling of the Tesa-tape.jpg
    43.3 KB · Views: 50
  • Areas that need a 2nd layer of gelcoat.jpg
    Areas that need a 2nd layer of gelcoat.jpg
    26.3 KB · Views: 62
Hi again,
today's work is, to paint the 2nd layer of gelcoat to the areas, that are marked in red at the last photo of my last reply. I cleaned the areas careful with a few acetone (only a few) from the dust of the wetsanding, that perhaps has been there. Aft a while of drying, I made new Tesa-tape around the area, that I'll go to paint with new gelcoat again. Then I saved all around that area, for not becoming new gelcoat there where I not want to have it (like at the 1st gelcoating). I took on my rubber-gloves etc. and mixed fresh gelcoat. Then I painted the areas and waited for the begining of the hardening process. This type of gelcoat, I already told, is very "thin". It was not easy to get the new gelcoat in that form I want to have it. I did put a bit (really only a few) more on the areas, that later I can sand down more, if the form of the surface is not 100% correct. At least, I made Tesa-tape to the surface of the painted areas to get a full hardening process of the new gelcoat. Finally I secured the working area for waiting for tomorrow. That's it for today.

Now I prepare to go for a visit to Dortmund, the city where the Soccer-team of Gemany and the "Squadra Azurra" (Soccer-team of Italy) do fight tonite in a big battle, to get into the Final match of the FIFA World Cup next Sunday.
Whole Italy and whole Germany are in a sort of big "state of emergency" today... :)
But, Germans and Italians always are very good friends, so I hope, to the opposite of the way the match against Argentina unfortunately did end last Friday (tumult between the players of Team ARG and Team GER...), at least "Fairplay" do rule this match. "We will see", to quote the famous German "Soccer-Emperor"Franz Beckenbauer... :)

Ciao and to all you that are citizens of the USA: Have a great Independence Day!
LooserLu

to be continued
 

Attachments

  • Preparing for the 2nd gelcoating with Tesa-tape.jpg
    Preparing for the 2nd gelcoating with Tesa-tape.jpg
    55.1 KB · Views: 53
  • Aft the 2nd gelcoating - Tesatape already is on the surface.jpg
    Aft the 2nd gelcoating - Tesatape already is on the surface.jpg
    65.3 KB · Views: 59
  • Secure the working area for the next day.jpg
    Secure the working area for the next day.jpg
    67.4 KB · Views: 43
LooserLu said:
Hi again,
today's work is, to paint the 2nd layer of gelcoat to the areas, that are marked in red at the last photo of my last reply. I cleaned the areas careful with a few acetone (only a few) from the dust of the wetsanding, that perhaps has been there. Aft a while of drying, I made new Tesa-tape around the area, that I'll go to paint with new gelcoat again. Then I saved all around that area, for not becoming new gelcoat there where I not want to have it (like at the 1st gelcoating). I took on my rubber-gloves etc. and mixed fresh gelcoat. Then I painted the areas and waited for the begining of the hardening process. This type of gelcoat, I already told, is very "thin". It was not easy to get the new gelcoat in that form I want to have it. I did put a bit (really only a few) more on the areas, that later I can sand down more, if the form of the surface is not 100% correct. At least, I made Tesa-tape to the surface of the painted areas to get a full hardening process of the new gelcoat. Finally I secured the working area for waiting for tomorrow. That's it for today.

Now I prepare to go for a visit to Dortmund, the city where the Soccer-team of Gemany and the "Squadra Azurra" (Soccer-team of Italy) do fight tonite in a big battle, to get into the Final match of the FIFA World Cup next Sunday.
Whole Italy and whole Germany are in a sort of big "state of emergency" today... :)
But, Germans and Italians always are very good friends, so I hope, to the opposite of the way the match against Argentina unfortunately did end last Friday (tumult between the players of Team ARG and Team GER...), at least "Fairplay" do rule this match. "We will see", to quote the famous German "Soccer-Emperor"Franz Beckenbauer... :)

Ciao and to all you that are citizens of the USA: Have a great Independence Day!
LooserLu

to be continued

That's a very nice photo essay, especially for people like me, who are not handy. My Laser has very similar damage but it's way at the bottom of the mast tube. How can I possibly repair that? My hand is too big and my arm too short to get to the trouble spots....:
No leak (as yet), just damaged gelcoat.
 
Nice work. I bet even Shevy Gunter would be proud of the detail.

(Where in the world is Shevy anyway??)

Before and during repair is nice. Let's have some after you sail it hard shots as well!!!

Send us photos after a year of sailing!!!

And sail every day!!!
 
Ahh.. the joys of owning a beater. I had a minor leak around the top of my mast step -- when I blew a little air in my hull and soaped all over I got bubbles there.. My repair procedure:


  1. Wait for a rare moment of dry weather.
  2. Grind the damaged area with 80 grit sandpaper.
  3. Notice large number of mosquitos active.
  4. Wash area with acetone. Let acetone dry.
  5. Pause to swat at bugs.
  6. Mix a batch of epoxy.
  7. Dispatch helper (son) to find bug repellant.
  8. Notice large number of mosquitos in epoxy. Pick most of them out.
  9. Paint unthickened epoxy onto the damaged area.
  10. Soak self and most of repair area with mosquito repellant.
  11. Mix a little silica into the epoxy to "mayonnaise" consistency.
  12. Pick the worst of the bugs out of the epoxy. Again.
  13. Daub epoxy around and over the repair area, using a piece of broken Opti batten.
  14. Curse bugs.
  15. Smooth ("smooth" is a relative term) the epoxy using gloved finger.
  16. Absent-mindedly swat at mosquito on knee with epoxy-covered glove.
  17. Pick remaining few bugs out of the epoxy. The repair is without a doubt structurally sound, smooth enough not to abrade the mast, and ugly.
  18. Take one last look at repair. Chuckle as reminded of L. Francis Hereshoff's description of modern polymer resins as "Frozen snot".
  19. Throw tools, supplies, trash into cardboard box. Race towards car, with 10,000 bloodthirsty insects in hot pursuit.
  20. Apply vinegar to knee to remove epoxy.
 
Hi again,
I just returned from my journey to the Soccer-"thriller-match" "Italy vs. GER". Yes, we, the GER's, are mourning a lot in the moment about loseing the match... :..( But also, now, a lot of "fans" of GER do look forward with our friends, the people from Italy, for their success at the final match next Sunday. 3.000.000 spectators peaceful have been outside at the public viewing areas yesterday and this never happend in GER before. Our friends from Italy, that live in GER did made a big party on the streets here and their fun not will be forgotten for a long time and helps us GER's to get happy again aft losing the match. Okay, now I return back to the thread here.


gouvernail said:
Nice work.

Thanks gov, your comment is like an "order of honorary" for me :)

As I already told before, this is my second Laser, where I have to do such a repair. I let you see, in attachment to this reply, two pic's of the old Laser 46438, where the same damage I repaired in June 2005.
The areas, that have been gelcoated, are to be seen at one of the photos. There, in black color, I've marked that areas that have been damaged (already aft the second gelcoating, but before the final sanding and polishing was done). This damages, I guess, came in reason the boat is old and the gelcoat lost flexibility. So, it is not a question of the "quality of production" (like with the Laser of 2001).
The second photo let us see the damaged area of the old boat aft a year of strong sailing (also in winds over force 5). As you can see, you see nothing. This means: the repair is durable in the moment. But, gov, you are right, I guess, aft a while (years), this areas will get new cracks again and then the job has to be done again.

gouvernail said:
I bet even Shevy Gunter would be proud of the detail.

(Where in the world is Shevy anyway??)

Personally, I'm absolutely sure Shevy is very fine. If I would have such a great chance, to sail at the very nice "Channel of Bosporus" / "Marmara Sea", I 120% also would forget the rest of the Lasersailing globe, too. Especially, if I would be a former member of the ILCA-NA (like Shevy has been), "a regional Laser-class, that has been so stupid to allow the owner of their monopoly- "Out-of the-box-boat-builder" at that region, to install his own brother as the president of the ILCA-NA" (to quote someone that has been member at the ILCA-NA) -> I guess, its a very big reason, why we not will hear anything of drLaser for a very long time in future....

DrLaser did had a report to the this theme of theis thread here, but unfortunately I not did made a hardcopy if it. The report is called "Minor surgery for hairline cracks in the mast step" and was to find at the chapter "maintenance& fitness" at the former "drlaser.org"-website. Perhaps someone has this report and can tell us from that text, if there is something useful for "Wavedancer"'s problem. But I never would put my hand into the mast tube to deep, the risc of "being fixed" there is very high and that would be really terrible.

The thrid and fouth photos in attachment show the result of the second gelcoating at Laser "Manatee" (GER 171442), that I did yesterday. In the moment it is to hot outside for the LooserLu to work, but in the late afternoon I begin to sand the gelcoat down till it chips away from the Tesa-tape by itself. Then I make new photos.

Ciao
LooserLu

P.S.:
Chris, thanks for the good description, good sailing to you. :)

P.P.S:
gouvernail said:
... Let's have some after you sail it hard shots as well!!!
Send us photos after a year of sailing!!!
And sail every day!!!

Of course I'll take photos and I try to sail as often I can. But in the moment, Laser GER 46438 waits for a new owner and is not alowed to sail. And Laser Manatee, as you can see, is in repair.
Also, in the moment, I intensive teach the new, very-young Laserfleet captain of my sailing club, how to care correct for the 7 Lasers we have there at the club. This has priority "1" for the Looserlu. We need some "young blood" in our club-Lasers on the water and around that Lasers - and I guess, the gov would say: Yes, this is more important, then that an old fart like the LooserLu gets out for some practice on the water and leave the youth alone, right? ;)
 

Attachments

  • Laser GER 46436  June 18th 2006.jpg
    Laser GER 46436 June 18th 2006.jpg
    283.8 KB · Views: 69
  • Result aft the drying of the 2nd gelcoating 2.jpg
    Result aft the drying of the 2nd gelcoating 2.jpg
    58 KB · Views: 69
  • Result aft the drying of the 2nd gelcoating 1.jpg
    Result aft the drying of the 2nd gelcoating 1.jpg
    63 KB · Views: 60
  • Laser 46438 Maststep- aft gelcoating-dremeling the 2nd layer June 2005.JPG
    Laser 46438 Maststep- aft gelcoating-dremeling the 2nd layer June 2005.JPG
    400.3 KB · Views: 70
Hi again,
I continued the work this afternoon.
First, I sanded the surface of the gelcoat VERY CAREFUL a bit down with the dremel-dilller and a rough (dry-)sanding-tool for it.
Then I took a small piece of wood and dry-sanding paper of a "grid 80" (per cm²). This I have done also only a few and very careful, only to get "in major" the correct form of the surface of gelcoat.
Then, I started to wet-sand with a suitable permanent-marker and wet-sand paper of grid 400 per cm²around of that permanant marker up and down and across to this, inside of the mast tube. The edge to the deck I also sanded down very careful. The gelcoat-film got thinner and thinner and I changed the wet-sand paper to 600 grid per cm². Now I continued the work, like with the 400er paper and I always used enough water. The gelcoat film now gets thinner and thinner and the correct form of the surface already can be imagined a bit.

Unfortunately, a big thunder storm came up, because it has been to hot during the last days here. I had to stop the work and do continue tomorrow.


Ciao
LooserLu

P.S.: Beause the format of the 1st two photos did not wanted to suit to the upload-limits of the software of TLF if .jpg-file-format is used, I had to take a .pdf-file-format to upload them correct.
 

Attachments

  • Sanding the 2nd layer of gelcoat.pdf
    129.3 KB · Views: 50
  • Wetsanding the 2nd layer of gelcoat by hand.pdf
    67 KB · Views: 34
  • During wet sanding the 2nd layer of gelcoat 1.jpg
    During wet sanding the 2nd layer of gelcoat 1.jpg
    62.9 KB · Views: 48
  • During wet sanding the 2nd layer of gelcoat 2.jpg
    During wet sanding the 2nd layer of gelcoat 2.jpg
    49.1 KB · Views: 59
Add to list of 20 items>>>

Pull epoxy covered rags from curious playful puppy's mouth.

Wash puppy's teeth with alcohol.

Wash epoxy out of puppy fur.

Put away washing rags.

Find puppy with mouthful or other rags with 5200.

Wash puppy's teeth with Acetone.

Hose puppy's mouth

Drag hiding puppy from under house

Hold nearly empty peanut butter jar at puppy's mouth level for 20 minutes while extensive licking action serves to rinse puppy's mouth and renew friendship

Feed puppy for another 14 years

so far

http://schrothfiberglass.com/Skipper.html
 
Hi,
today, I finish the work of this minor repair at the mast tube. Aft a while of wetsanding by hand the new 2nd layer of gelcoat, the thin film of gelcoat chipped away upon the surface of the Tesa-tape as planned. This is the point of time, to keep away CAREFUL the Tesa-tape around the damaged area.
Aft I have done this successfully, I continued to wetsand !CAREFUL! the damaged areas and the edges of that to the original gelcoat of the mast tube. Therefore I did take a small sheet of wetsanding paper of a grid 1000 per cm². This makes the surface "plan" and very pretty.
The final photo in attachment of this reply let us see the result of all the work of the last days of repairing tha damaged areas of the masttube.
To get a pretty-shiny surface there, I polish that areas intensive with "Starbrite Teflon Polish".

The hairline cracks at the starboard side (see above at one of the photos my first text) I soon seal with epoxy resin. There is no need in the moment, to sand there anything. But it is important to close that hairleine cracks with epoxy resin to not permit water to reach the fibreglass there.

Notice:
- This seal of gelcoat is really only a seal - like the work of filling a tooth that a dentist does. It holds for a while, but perhaps not for the lifetime of the hull.
- And, if perhaps, the secretly here looking quality-manager of PSE is interested to know it, here is the
Laser-production-number that is to find at the starboard-side of the transom
of the hull of Laser GER 171442: "GB-PSELS 0991 I-001"

Thanks for your attention and see you all somewhere on the water, ok.
Ciao
LooserLu
 

Attachments

  • Result aft wetsanding with grid 600 per cmxcm.jpg
    Result aft wetsanding with grid 600 per cmxcm.jpg
    49.2 KB · Views: 61
  • Result aft keeping away the Tesa-tape.jpg
    Result aft keeping away the Tesa-tape.jpg
    47 KB · Views: 53
  • Result aft the wetsanding with grid 1000 per cmxcm.jpg
    Result aft the wetsanding with grid 1000 per cmxcm.jpg
    91.7 KB · Views: 66

Back
Top