Deck joint / epoxy mixing

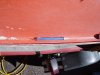
Question about re-gluing the hull-deck joint -

About how much length do you plan to epoxy in one batch? You can only mix and install so much before it starts to heat up and cure in the bucket.

Are you doing a foot at a time? 3 feet? Did you use a syringe to get it down into the joint, or is it way too thick? I'm planning to use 406 thickener and I've read peanut butter thickness... and that isn't going in any syringe!

Thanks!

ps - a Dremel is such a fun tool.
 
You didn't mention which epoxy you were using, but both West and MAS have slow hardners. Also you can extend the cure time by keeping the mixed resin cool, ie, either in a large surface area mxing pot or by putting the mixing pot inside another bucket with ice water. I've used both methods and had well over an hour working time on one rebuild project I was working on.

You can get some pretty thick mixture to squeeze from the syringe, maybe not peanut butter, but thick enoough from the gap filling in the rail.
 
I did the entire boat in spots with one small batch this past fall, probably did 10-12 total feet with out burning up a pot, I used 406 with West as well and ground out with a dremel about 3/4" depth. worked great and was easy to sand down flat again. I worked it in with a spatula, forcing it down, gravity took it down in some spots so I was able to add more on top
 
Yes, West System. I already have the 205 hardener, which sounds kind of fast - I see a 12 minute working time in one manual. I've read about spreading it out in a tray, and the cold idea sounds good.

I probably need to do about half of the boat perimeter. I think someone stored it deck down outside and it froze. I've cut three portholes to dry it out and do the rear bulkhead repair.

Scars, it sounds like yours might have been thinner than peanut butter? With the nice groove cut by the dremel, I would think a slightly runnier mixture could go down in there and fill gaps. I have syringes.
 
Just did this repair this past spring/summer. I was able to use 4 pumps of west at a time, mix in 406 to a thick, yet runny and used a syringe. It was very helpful to angle the boat so the rail was about 45 degrees so the epoxy didn't drip into the hull where it had completely de-laminated from the deck. The first 3 weeks everything held water tight, now I have leaks from areas that I did not repair yet (which were fine until I stressed them sailing). This was expected from a 1982 laser, and will be my fall project when the water gets too cold.
 
Did any of you clean out the gap with acetone as I've read? Pretty nasty stuff, but I have some. Does it just evaporate out of there?

Thanks!
 
yes my mix was a bit thinner as I wanted it to run as deep into my dremeled out groove as possible, I just added layers to build up until full, a little sanding to shape and fill somemore, worked great and is strong.

I didn't use acetone I was not concerned about it since I dremeled the piss out of it and I believe it was rough and raw which is good to stick to. I did however use my compressor and blow out as much stuff as I could before epoxy
 
I clamped in some spots and not in others. I had a 3 foot run where the deck was separated and needed to be clamped in 2 directions to get the right alignment for the rail. One clamp (actually 3) compressed the deck to the hull (pushing up and down if the boat was upright on a dolly) and one pushing the gap closed (port and starboard if that makes sense). the smaller gaps on the stern and elsewhere did not need to be aligned much so just filled and let sit. Make sure to shop vac out any debris or dust before hand and you should be ok without any acetone. Also tape off the area with blue tape and you will have very nice clean lines when done that will only require a little sanding to get rid of the sharp edges.

Hope this helps.
 
For the archives...
That epoxy is pretty interesting. I did some tests and some little batches, then got cocky and decided I could go to town and go around the whole boat. I mixed maybe 6 squirts with the pumps, so it was around 1 1/2 to 2" deep in the bucket (75 degrees, 205 Hardener). I mixed in the 406 thickener (do NOT open this can out in the wind!) and started with the syringe. It felt like the syringe mix was starting to clog the nozzle right away. I looked over at the bucket and it was starting to smoke! It melted my plastic fork stir stick and was red hot already. The whole bucket hardened solid in about 5 minutes.

So, I picked up some slow 206 hardener and went back to little batches (or you can spread it out in a paint tray so it doesn't cook!) I mixed mine fairly runny (way below peanut butter stage) and it was still work to suck it up into a syringe, but it leveled out well and sucked down into gaps. After a few minutes, I put some more on to fill the groove. Level and rock hard this morning.
 
Follow-up info for future searches.

The Dremel with a cutter wheel is the perfect tool to use. Take your time, it's a low-torque, high-speed motor. Don't bind up the wheel - it can shatter, right into your eyes at 30,000 rpms. Wear glasses! I set up a fan to blow the dust away as I cut so I could see.

The reinforced wheel cuts a 1/2" to 3/4" down into the foam / glue joint. Don't take out too much fiberglass from the hull or deck layer, just clean out the foam glue.

My bow joint was the worst. I used the Dremel as well as utility knives and an e-xacto knife to get all the crud out of there. Dried it out for a day after it was cleaned out. Vacuum all dust and debris out of the groove, maybe blow it out as well.
 

Attachments

  • DSC05972.jpg
    DSC05972.jpg
    70.5 KB · Views: 69
  • DSC05971.jpg
    DSC05971.jpg
    110.3 KB · Views: 68
  • DSC05973.jpg
    DSC05973.jpg
    133.3 KB · Views: 75
Once it's all clean, use the blue tape to mask as mentioned above. This keeps the epoxy off the rails, and you can build a small dam with it to rebuild chipped or broken rail areas.

I only ground out separated, cracked, and broken areas. Where it seemed really solid and original, I left it.
 

Attachments

  • DSC05976.jpg
    DSC05976.jpg
    90.4 KB · Views: 81
  • DSC05977.jpg
    DSC05977.jpg
    64.3 KB · Views: 80
Set up a mixing area. Read all the West System instructions about how it all works. Unless it's cold or you're only doing a tiny batch, use the slow 206 hardener.

Here's a melted stir stick and a wasted pot of expensive epoxy.
 

Attachments

  • DSC05986.jpg
    DSC05986.jpg
    126 KB · Views: 59
  • DSC05974.jpg
    DSC05974.jpg
    140.4 KB · Views: 64
I used West System 406 bonding thickener. Very very light fluff in a can. You add it to the epoxy after it's thoroughly mixed (which is why slow hardener is better), to the consistency you need for whatever job. Thinner for filling holes and grooves like the hull joint, very thick for vertical surfaces so it doesn't sag or run.

I knew very little about this and have never done any fiberglass work, so just read up and it's pretty easy. There are even technique videos on the West System website.

I used a West syringe. Tiny tiny nozzle, so cut it bigger with a utility knife. Too little and it won't suck the epoxy up, too big and you can't get it into the hull joint.

As mentioned by reddin above, I clamped some areas that needed to be squeezed, left most alone, and clamped vertically near the bow where the two halves needed to be aligned and leveled. The plastic wrap was to protect the clamps. Sands right off.

Top off the joint where it settles down in or where bubbles form. In 10 hours, it's hard as a rock but sands easily with the 406 added. I had a couple of bubble pockets after it cured, which I will rough up and fill later.

I kept going on this boat to repair the cockpit drain and rear bulkhead - I'll start another thread for that.

Good luck!
 

Attachments

  • DSC05975.jpg
    DSC05975.jpg
    82.6 KB · Views: 62

Back
Top